
October 7, 2010 • Strength & Conditioning
Powerline: Don’t neglect the neck in strength training
Do your players truly invest adequate time and effort in strengthening their necks?
It is my hope that everyone answered with a resounding, affirmative yes.
In football, as well as every other sport where violent collisions are part of the game, developing a strong, sturdy neck is a requisite. Coaches should think of the thick, brilliantly woven neck musculature as a flexible cylinder that supports the head and protects the cervical vertebrae. This masterpiece of muscle tissue is responsible for moving the head and neck in forward flexion, extension, lateral flexion and rotation. Additionally, it assists in swallowing and raising the ribcage during inhalation.It would be beneficial for all coaches to have at least a rudimentary knowledge base on the structure and function of the necks anatomy. Lets first take a look at some of the target muscles and their primary movements, followed by some suggestions for strengthening and developing these areas.
Structure and function
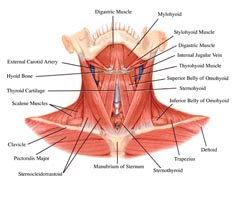 Diagram 1 illustrates the superficial anterior musculature, the most prominent being the sternocleidomastoids. When engaged unilaterally, the sternocleidomastoid laterally flexes the head to the same side, and rotates the head to the opposite side. When operating bilaterally, they flex the neck and assist in respiration. Two important intrinsic anterior muscles (not depicted) are the longus capitus (tucked between the trachea and cervical vertebrae) and the rectus capitus anterior, which are also responsible for flexion and rotation.
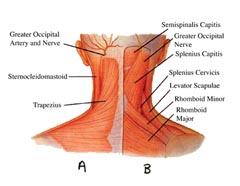
Diagram 2 depicts the trapezius, a large, broad structure, which extends and laterally flexes the neck. The semispinalis capitus, splenius capitus and splenius cervicis also extend and rotate the head and neck.
Diagram 3 is a superficial lateral view, with the scalenes playing roles in lateral flexion and rotation to the opposite side. The levator scapulae, in conjunction with the trapezius, are responsible for the shrug motion, as well as rotation to the corresponding side.

Obviously, not all of the muscle compartments are visible in these three diagrams, as this area entails a vast network of both extrinsic and intrinsic structures that comprise a remarkable ballast for the cervical spine and head.
Additionally, there are muscles (e.g., suprahyoids, digastric and infrahyoids) that affect movement of the jaw, tongue and act on the larynx.
For our discussion, we will focus on neck forward flexion, extension and lateral flexion. Many of the same muscles that flex and extend also rotate, which minimizes the need for direct rotational resistance.
Training the neck
There are several outstanding four-way neck machines on the market that fit the bill for neck training. If you do not have one in your facility, it would be a wise choice to purchase at least one unit for both training and liability purposes. From an injury-deterrent standpoint, there is no more important piece of equipment.
A workable option when training a large group of athletes concurrently is manual resistance (MR). Simply put, MR is a strength application where the resistance is provided by a spotter.
Lets look at some of the key checkpoints for MR neck training.
Coaching Point: Before continuing, a word of caution is in order: The neck area must be handled with extreme care and more than just a patronizing degree of sensitivity. I suggest that your entire staff takes the time to learn the proper administration of MR neck training and, initially, be the only ones spotting the techniques. Over time, your athletes will learn the correct administrative, technical and communication skills necessary for safe and productive MR execution.
Forward flexion
The lifter begins with the head in the extended position and the spotter interlocks his fingers (forming a tight cup) and places them over the forehead. A small towel can be used between the spotters hands and lifters forehead to provide more comfort.
 On command, gentle, even resistance is applied as the lifter flexes the neck concentrically to a position where the chin is in near contact with the top of the chest. After a slight pause in that position with constant tension being maintained in the target area the spotter carefully pulls back to finish with a smooth, evenly applied eccentric repetition. The next repetition is initiated when the lifter reaches the starting position.
Extension
The lifter assumes a position with the head flexed and the chin close to the top of the chest. The spotter cups his hands over the upper backside of the lifters head with a firm grip to prevent slipping off once the lifter initiates movement.
On command, the lifter starts movement in extension while the spotter provides enough evenly applied resistance to create and maintain tension in the target area. The movement is continued to full extension where a slight pause is inserted to ensure a smooth transition into the eccentric phase of the repetition. The lifter resists the spotters downward pressure evenly until the chin is near the chest. The next rep is engaged when the lifter reaches the starting position.
Lateral flexion
The lifter tilts his head to the shoulder opposite the side to be worked. The spotter places his hand above the ear on the side of the head to be worked.
On command, the lifter initiates the lateral movement by creating tension into the spotters hand with a smooth concentric contraction to the point where the head is as close to the near shoulder as possible. After a slight pause with continued tension, the spotter starts an even eccentric contraction as he applies light pressure to the side of the head. The eccentric repetition is continued until the lifters head is back to the original starting position, when the next repetition is initiated. Obviously, both sides of the neck must be worked in this fashion.
We recommend that one to two sets of 10 to 12 reps be performed for each exercise two to three days per week on a year-round basis. Again, athletes can use a four-way neck machine for this purpose, but MR offers a no excuses option in situations where a machine is not available, or when you are training a large group of athletes at once and machine use isnt practical. Most of our work is performed manually, though we do have three, four-way neck machines in our facility for athletes who wish to perform additional work a good habit that we encourage.
Shoulder-shrug work for the upper trapezius is also done in conjunction with the direct neck exercises. Dumbbells, lifting bars, kettlebells, sandbags, chains, weight plates and a host of other implements can be used for this purpose.
Basically, shrugs are performed from either a standing or seated position while holding the resistance with straight arms. The shoulders are then shrugged to the ears where a slight pause is initiated, then they are lowered in a controlled fashion to the starting position.
Just as with the other neck exercises, one to two sets of 10-12 reps suffices.
Final rep
I vividly remember as a high school football coach back in 1976 when the NCAA and the National Federation of State High School Athletic Associations adopted much-needed rule changes to discourage the head-first tackling and blocking techniques being used by players at all levels.
Coaches and players must understand that the available scientific data indicate that catastrophic cervical spine injuries are due to purposeful axial loading of this area. Axial loading occurs when the head is slightly flexed the chin is down to approximately 30 degrees thus placing the cervical spine in a relatively straight column. If high-velocity contact is made with the crown of the head when the cervical spine is in this position, it is more likely to buckle under the stress.
Essentially, the kinetic energy produced by the contact is transferred to the cervical column resulting in excessive axial loading. The concurrent buckling is a mechanism of energy release that is produced when slender, segmented structures are subjected to this type of compressive loading. If these bony fragments encroach the spinal cord, the results can be devastating.
Coaches must continue to teach and emphasize proper blocking and tackling techniques. Two very simply stated rules of engagement for players are as follows:
1. Keep the head up, but do not use it as the primary point of contact. Doing this places the cervical spine in a more favorable, stabilized position and makes the primary contact points consist of the shoulders, chest area, arms, and hands.
2. See the target. Teaching your players to see what they are about to hit allows the neuromuscular system to prepare for the ensuing collision by initiating contraction of the appropriate musculature.
And, of course, when it comes to strength training, don’t neglect the neck!

NIL regulations and the transfer portal are ever-changing under the NCAA. Join us for an insightful webinar tomorrow, April 23 at 1pm ET, where three seasoned collegiate strength coaches will share their insights on the shifting landscape of college athlete training in the wake of NIL regulations and the Transfer Portal.![]()
![]() In this engaging session, our expert panel will delve into their philosophies, principles, and the transformative journey of the college strength coach profession. From adapting to new regulations to optimizing athlete performance, they'll explore the challenges and opportunities presented by these recent developments.
In this engaging session, our expert panel will delve into their philosophies, principles, and the transformative journey of the college strength coach profession. From adapting to new regulations to optimizing athlete performance, they'll explore the challenges and opportunities presented by these recent developments.![]()
![]() Don’t wait, register today:
Don’t wait, register today:![]() greatamericanmediaservices.zoom.us/webinar/register/2017098165086/WN_OyxJfA5YRVaSOQ3LdtPyXw#/regi...
greatamericanmediaservices.zoom.us/webinar/register/2017098165086/WN_OyxJfA5YRVaSOQ3LdtPyXw#/regi...![]()
![]() 🌟 Want to watch but can't make it to the live webinar? Make sure to register to be notified as soon as the recording is available.
🌟 Want to watch but can't make it to the live webinar? Make sure to register to be notified as soon as the recording is available.![]()
![]() (Sponsored by Mondo Sport&Flooring)
(Sponsored by Mondo Sport&Flooring)![]()
![]() #athletics #NIL #transferportal #studentathletes #collegeathletics #coaches #NCAA
#athletics #NIL #transferportal #studentathletes #collegeathletics #coaches #NCAA
