
February 3, 2010 • Sports Medicine • Strength & Conditioning
Odds ’N Ends: Covering Strength Training’s Details
Strength coaches tend to have their personal short-list of “core lifts” that they have determined to be vital in overall development.
Conversely, they have a stash of “auxiliary lifts” that they occasionally break out for variety or to target areas that may not be getting enough attention with the base format.
While I certainly believe that are movements that provide more bang-for-the-buck, especially multi-joint lifts, I’m not as convinced that any compartmentalized group of lifts reigns supreme.And, most assuredly, there are areas that must be addressed no matter what your personal philosophy embodies. This time out, I would like to address four of those areas: The neck, the grip (hands/wrists/forearms), the rotator cuff of the shoulder, and the ankle.
The Neck
For athletes involved in sports where violent collisions are not only possible, but also encouraged and inevitable, building a strong neck is a requisite.
The neck musculature is a brilliantly woven muscular masterpiece that performs a wide variety of tasks. These include not only moving the head and neck in forward flexion, lateral flexion, extension, and rotationally right/left, but also assisting in swallowing and raising the ribcage during inhalation.
Having at least one four-way neck machine in your lifting arsenal surely helps, but if you do not, manual resistance provides a workable option.
Let’s look at some of the checkpoints for manual resistance neck training.
Coaching Point: As you may well know, the neck area must be handled with great care and more than just a patronizing degree of caution. I recommend that the entire coaching staff take the time to learn the proper administration of manual neck training. Initially, coaches should be the only ones spotting the techniques and this should remain constant until the athletes have learned to spot appropriately. And while communication between the lifter and spotter is a polestar variable in all manual resistance movements, it takes on even more significance when it’s applied to the neck region.
Note: To view a video demonstration of manual neck training, along with some additional technique suggestions, check the January Powerline Online segment.
Our athletes perform the following neck exercises 1-2 days per week on a year-round basis. At least 1-2 sets of 10-12 reps are executed for each movement.
 |
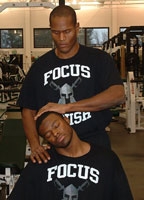
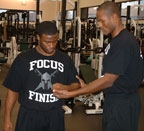
| Photo 1 |
• Forward Flexion (Photo #1 – Starting Position) – With the lifter assuming a tilted head position in extension, the spotter interlocks his fingers, places them over the lifter’s forehead, and applies gentle, even resistance as the lifter flexes the head forward to a position where the chin is in near contact with the upper chest. After a slight pause with continued tension, the spotter pulls back slowly – again, with great care – while the lifter gives enough resistance to ensure an even, gradual eccentric contraction to the starting position. Another slight pause is evidenced at the starting point before initiating the next rep.
 |
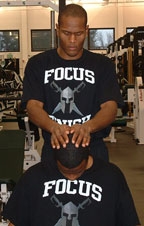
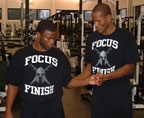
| Photo 2 |
•Lateral Flexion (Photo #2 – Starting Position for Left Side) – The lifter laterally flexes his head to just above the shoulder on one side while the spotter places his hand on the opposite side above the ear. The lifter creates the tension by initiating a lateral movement against the spotters’ hand resistance for a smooth concentric contraction to the opposite shoulder. After a slight pause with continued tension, the spotter applies gentle pressure while the lifter resists in a smooth, controlled fashion back to the starting position. After another brief pause, the exercise is repeated. Obviously, the exercise is performed for both the right and left sides.
 |
| Photo 3 |
• Extension (Photo #3 – Starting Position) — The lifter assumes a position with the head flexed and the chin close to the top of the chest. The spotter cups his hands over the upper rear of the lifter’s head firmly enough to avoid slipping off once the lifter starts the exercise. The lifter then starts moving the head to the rear while the spotter provides enough evenly applied pressure to create and maintain tension in the extensor muscles of the neck. Once in full extension, a slight pause is inserted to ensure a smooth transition, then the spotter applies smooth, even pressure that the lifter resists until the head is back to the starting position.
The Grip
The hands, wrists, and forearms are called upon for just about every upper body movement imaginable, in addition to a few whose main target is the lower body. It seems only just and fair that we spend at least a little time giving them some personal attention.
This can be accomplished with simple exercises such as wrist flexion and extension with barbells, dumbbells, or any weighted device that serves the purpose.
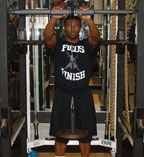 |
| Photo 4 |
“Wrist rolls,” such as the ones demonstrated with a special device in Photo #4, can be easily incorporated with the use of various diameters of PVC pipe rigged with a small rope to which weight plates are clipped.
On occasion, we introduce “thick bars” to a training script to put an additional stress on the grip. These bars vary in diameter from 3-5 inches, and they can be used for just about every basic exercise that normally employs a conventional bar.
Additionally, as I’ve discussed in past articles and Powerline Online, we use thick, heavy ropes for a multitude of conventional movements that provide the added advantage of improving grip strength.
Use your imagination and whatever you have at your disposal, but don’t lose your grip on hand, wrist, and forearm strength.
If you do, something important just might slip out of your grasp!
The Rotator Cuff
Every coach installs exercises that work the major superficial muscles of the shoulders, but this is often done at the expense of the smaller, intrinsic rotator cuff musculature (i.e., supraspinatus, infraspinatus, teres minor, and subscapularis).
In a past article, I demonstrated some work we perform with bands to engage this vital complex, but it can also be done manually when no equipment is available.
Let’s look at the manual approach:
 |
| Photo 5 |
• External Rotation (Photo #5 – Mid-range Position, Left Shoulder) – The spotter will pin the elbow against the lifter’s side and cup his hand over the lifter’s fist. The lifter will then rotate the lower arm to the outside (toward the spotter, as pictured) as far as comfortably possible. After a slight pause in that position, the spotter applies gradual, even resistance to the inside and back to the starting position.
 |
| Photo 6 |
• Internal Rotation (Photo #6 – Mid-range Position, Left Shoulder) – With the elbow again pinned against the lifter’s side, the spotter cups the lifter’s entire fist with his hand. The lower arm is placed in external rotation (i.e., the starting position is now the mid-range position of external rotation, as in photo #5). The lifter rotates the arm inward toward his body while the spotter provides smooth, even resistance. After a slight pause at the depicted mid-range position, the spotter gradually pulls the arm outward while the lifter resists.
I recommend that 1-3 sets of 10-12 reps of these exercises be performed for both shoulders at least 1-2 times per week.
Ankles
Whether it’s having your athletes perform heel/calf raises off the edge of platforms after every set of squats, or using specially designed machines for plantar (toes down) flexion and dorsi (toes up) flexion, some form of ankle strengthening is critically important. And yet, it is one of the most neglected areas in many strength-training programs.
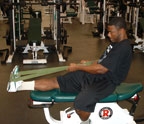 |
| Photo 7 |
One way we approach it is with the use of stretch bands (Photo #7).
After looping the band around the top of the foot and firmly beneath it, a multitude of ankle movements – including rotation (clockwise and counter-clockwise), inversion (foot moved inward), eversion (foot moved outward), plantar flexion, and dorsi flexion (with the help of a spotter).
Any array of sets/reps can be executed, but I would recommend that you pick 1-2 of the above-mentioned movements and perform 1-2 sets of 12-15 reps at least twice per week.
Final Rep
In a “hurry-up and get it done” coaching world, it is easy to fall into an ensconced routine of sticking to one’s chosen meat and potatoes strength training program and ignoring the garnish.
However, the exercises discussed here are more than merely window dressing. When you really examine your program, you will probably find that neglecting them can prove to be the thorn in the lion’s paw.
TIP FROM THE TRENCHES
High School Linemen – Bigger or Obese? A recent article (Nov. 30, 2007) in The New York Times illuminated the problem of the influx of overweight high school football lineman. The article focused on two studies – one published in The Journal of the American Medical Association, the other in The Journal of Pediatrics – indicating that weight problems among high school linemen far exceeded those of other male children and adolescents. Some of the numbers are staggering and disheartening.
One of the studies looked at 3,600 high school linemen in Iowa and found that 45% were overweight and 9% were classified with adult obesity.
The other study examined 650 football players in Michigan youth leagues from the ages of 9-14 and also found that 45% were overweight or obese.
The bottom line here that hits me right between the eyes is that maybe these kids are getting the wrong message about “size.” It’s reflective of a 2003 study at the University of North Carolina showing that 56% of NFL players were considered obese, and that NFL linemen have a 52% greater risk of dying from heart disease than the general public.
To make matters even more frightening, the study showed that the linemen are 3.7 times more likely to die of heart disease than NFL players at other positions.
The message we must send to our young athletes is that “getting bigger” does not equate with “getting fatter!” That proclamation should be delivered early in their careers (yes, even in the youth leagues) and continue throughout their playing days – especially with the linemen. Coaches need to be the most visible mentors in this endeavor, along with parents, trainers, and primary care physicians.
In Powerline, we will continue to offer suggestions – from both nutritional and training perspectives – on healthy, lean weight gain.
– Ken Mannie
About the Author
Ken Mannie is the head strength/conditioning coach at Michigan State University. ([email protected])
You Might Also Like


NIL regulations and the transfer portal are ever-changing under the NCAA. Join us for an insightful webinar tomorrow, April 23 at 1pm ET, where three seasoned collegiate strength coaches will share their insights on the shifting landscape of college athlete training in the wake of NIL regulations and the Transfer Portal.![]()
![]() In this engaging session, our expert panel will delve into their philosophies, principles, and the transformative journey of the college strength coach profession. From adapting to new regulations to optimizing athlete performance, they'll explore the challenges and opportunities presented by these recent developments.
In this engaging session, our expert panel will delve into their philosophies, principles, and the transformative journey of the college strength coach profession. From adapting to new regulations to optimizing athlete performance, they'll explore the challenges and opportunities presented by these recent developments.![]()
![]() Don’t wait, register today:
Don’t wait, register today:![]() greatamericanmediaservices.zoom.us/webinar/register/2017098165086/WN_OyxJfA5YRVaSOQ3LdtPyXw#/regi...
greatamericanmediaservices.zoom.us/webinar/register/2017098165086/WN_OyxJfA5YRVaSOQ3LdtPyXw#/regi...![]()
![]() 🌟 Want to watch but can't make it to the live webinar? Make sure to register to be notified as soon as the recording is available.
🌟 Want to watch but can't make it to the live webinar? Make sure to register to be notified as soon as the recording is available.![]()
![]() (Sponsored by Mondo Sport&Flooring)
(Sponsored by Mondo Sport&Flooring)![]()
![]() #athletics #NIL #transferportal #studentathletes #collegeathletics #coaches #NCAA
#athletics #NIL #transferportal #studentathletes #collegeathletics #coaches #NCAA
